Table of Contents
- Introduction: What Residential Concrete Coating Achieves
- How Coatings Change Concrete Performance
- Assessing Your Surface: Signs That Coating Is a Good Option
- Selecting a Finish: Textures, Sheens, and Slip Resistance
- Preparation Essentials: Cleaning, Repairs, and Moisture Testing
- Application Methods Compared: Roll-On, Spray, and Trowel Systems
- Drying, Curing, and Ideal Environmental Conditions
- Maintenance Plan: Seasonal Care and Stain Removal Tips
- Durability Factors and Lifecycle Expectations
- Eco-Friendly Formulations and Health Considerations
- Common Problems and How to Diagnose Them
- When to Consult a Professional for Complex Issues
- Summary Checklist for a Successful Coating Project
- Further Reading and Resources
Introduction: What Residential Concrete Coating Achieves
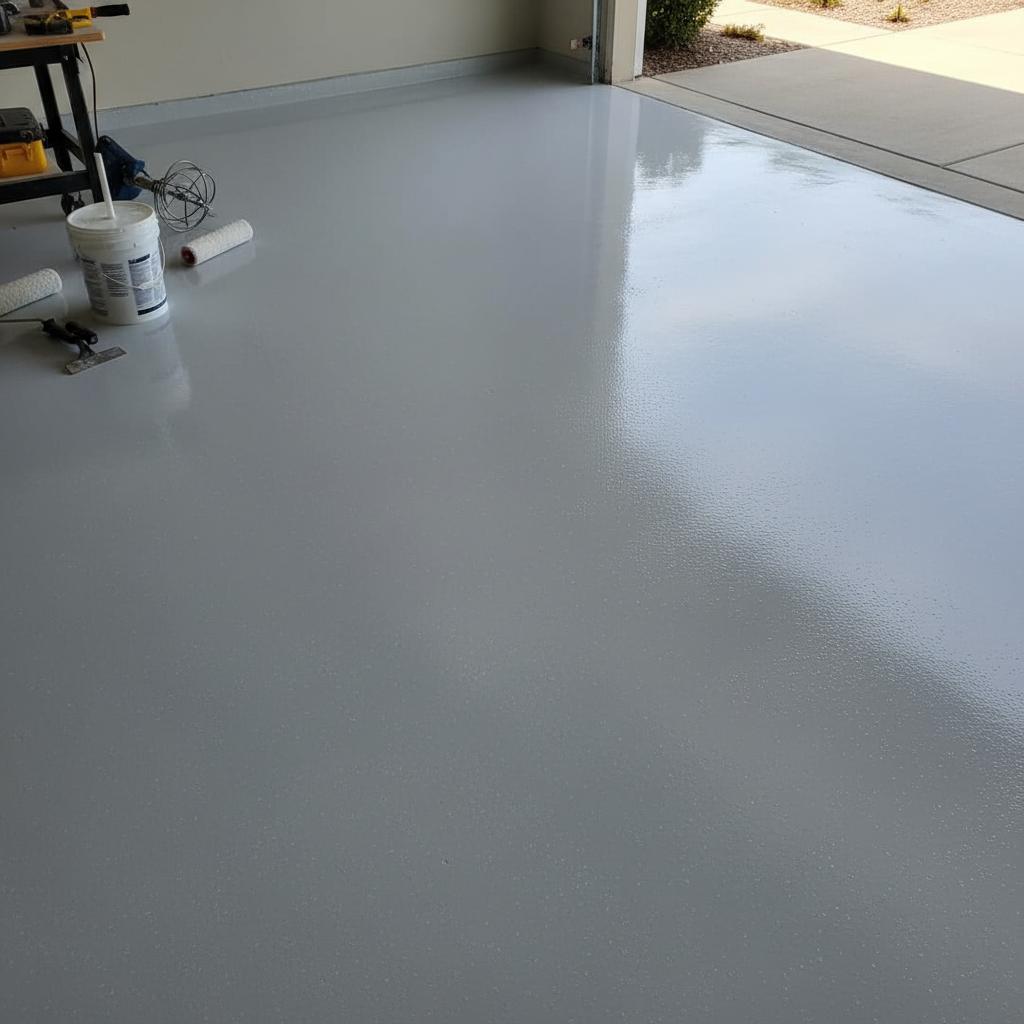
Bare concrete surfaces in your garage, on your patio, or along your driveway are functional but often fall short in terms of aesthetics and long-term durability. They are porous, prone to staining, and can crack or spall over time due to weather and wear. A residential concrete coating is a specialized solution designed to protect, strengthen, and beautify these surfaces. It involves applying a liquid polymer that chemically bonds with the concrete, creating a seamless, non-porous layer. This guide will walk you through everything a homeowner needs to know about choosing, preparing for, and maintaining a high-quality concrete coating.
Unlike simple paint or a basic concrete sealant, a robust coating system offers far more than just a change of color. It transforms a utilitarian slab into a high-performance floor that resists chemical spills, abrasion, and moisture intrusion. Whether you’re aiming for a showroom-quality garage floor, a slip-resistant pool deck, or an easy-to-clean basement floor, a professional-grade residential concrete coating provides a durable and attractive finish that significantly enhances your property’s value and usability.
How Coatings Change Concrete Performance
Applying a coating fundamentally alters the physical and chemical properties of a concrete surface. The science behind this transformation explains why coated concrete is superior to its untreated counterpart in nearly every residential setting.
Chemical and Physical Enhancements
Concrete is naturally porous, meaning it has a network of tiny holes that can absorb liquids. This is why oil spills in a garage or wine spills on a patio can leave permanent stains. A high-quality concrete coating creates an impermeable barrier that prevents this absorption.
- Stain Resistance: The non-porous surface makes it easy to wipe away common household chemicals, automotive fluids, and other liquids without leaving a mark.
- Abrasion Resistance: Coatings, particularly those based on epoxy and polyaspartic resins, are incredibly hard. They protect the underlying concrete from scratches, scuffs, and damage caused by dropped tools, heavy equipment, or vehicle traffic.
- Impact Resistance: The coating helps distribute the force of an impact over a wider area, reducing the likelihood of chipping or cracking the concrete slab itself.
- UV Stability: Many modern coatings contain UV inhibitors that prevent the surface from yellowing or degrading when exposed to direct sunlight, making them ideal for patios, pool decks, and driveways.
Improving Safety and Aesthetics
Beyond protection, coatings offer significant aesthetic and safety improvements. Homeowners can choose from a vast array of colors, textures, and finishes to match their home’s style. From solid colors to decorative flake or metallic systems, the design possibilities are nearly endless. Furthermore, special aggregates can be incorporated into the topcoat to create a textured, slip-resistant surface, which is a critical safety feature for areas that get wet, such as pool decks and entryways.
Assessing Your Surface: Signs That Coating Is a Good Option
Before investing in a residential concrete coating, it’s essential to evaluate your current concrete slab. Not all surfaces are immediately ready for a coating, and some signs of distress may indicate that a coating is a highly beneficial upgrade.
Key Indicators for Coating
- Stains and Discoloration: Persistent stains from oil, rust, or chemicals that cannot be removed with conventional cleaning are a primary reason homeowners opt for a coating. It provides a fresh, clean slate.
- Minor Cracks: Small, non-structural hairline cracks are common in concrete. A flexible coating system can often bridge these cracks, preventing them from widening and protecting them from water intrusion.
- Spalling or Pitting: If the surface of your concrete is flaking or has shallow pits, it’s a sign of surface degradation. A coating can halt this process by creating a durable new wear layer.
- Dusting: A weak concrete surface can produce a fine powder or dust. This is common in older garages and basements. Coating the floor eliminates dusting, creating a cleaner and healthier environment.
- Desire for an Upgrade: Often, the main reason is simply to improve the look and function of the space. A coated garage floor is easier to clean, brightens the room, and feels more like an extension of your home.
However, major structural issues like wide, active cracks or significant heaving of the slab must be addressed by a foundation specialist before any coating is applied.
Selecting a Finish: Textures, Sheens, and Slip Resistance
The type of finish you choose will impact the final look, feel, and functionality of your surface. Modern residential concrete coating systems offer a wide variety of options.
Common Coating Systems
- Epoxy Coatings: The traditional standard for garage floors, epoxies are known for their extreme hardness, chemical resistance, and strong adhesion to concrete. They are typically applied in multiple layers.
- Polyurethane Coatings: Often used as a topcoat over epoxy, polyurethane offers superior UV resistance (making it great for outdoor use) and better flexibility, which helps with scratch resistance.
- Polyaspartic Coatings: A newer-generation coating that cures very quickly, allowing for one-day installations. Polyaspartics are highly durable, UV-stable, and remain flexible in a wide range of temperatures.
Textures, Sheens, and Safety
Once you’ve chosen a base chemistry, you can customize the appearance.
- Sheen: Finishes range from high-gloss, which reflects a lot of light and is easy to clean, to satin or matte, which hides minor imperfections and reduces glare.
- Decorative Flakes: Small vinyl chips are broadcast into the wet coating to create a multicolored, textured look similar to granite or terrazzo. This is one of the most popular finishes for residential garages.
- Metallic Pigments: Special pigments can be mixed into the coating to create a three-dimensional, pearlescent effect with swirling patterns and depth.
- Slip Resistance: For areas prone to getting wet, an anti-slip aggregate (like fine aluminum oxide) can be added to the final topcoat. This creates a texture similar to fine-grit sandpaper, providing crucial traction without being harsh on bare feet.
Preparation Essentials: Cleaning, Repairs, and Moisture Testing
Surface preparation is the single most important factor in the success and longevity of a residential concrete coating. A coating is only as good as the surface it is bonded to. Rushing this stage will almost certainly lead to failure.
Step 1: Thorough Cleaning
The surface must be completely free of dirt, oil, grease, and any previous sealers or paints. This typically involves:
- Degreasing: Using a powerful concrete degreaser to lift and remove any oil or fluid stains.
- Grinding or Shot Blasting: The preferred method for professional installers is mechanical grinding. A walk-behind concrete grinder with diamond-impregnated discs removes the top layer of concrete, opening up the pores for maximum adhesion. This process is far superior to acid etching, which can be inconsistent and hazardous.
Step 2: Concrete Repair
Any cracks, pits, or spalled areas must be repaired. Cracks are typically chased (widened slightly with a grinder) and filled with a flexible epoxy or polyurea crack filler. Pits are patched with a polymer-modified cementitious patching compound. The repairs are then ground flush with the rest of the surface.
Step 3: Moisture Testing
Concrete is like a sponge; it can hold and transmit moisture from the ground below. If a non-breathable coating is applied to concrete with high moisture vapor transmission, the trapped moisture can create hydrostatic pressure, causing the coating to bubble and peel. A simple moisture test involves taping a small square of plastic sheeting to the floor for 24 hours. If condensation forms under the plastic, a professional moisture vapor barrier may be required before the coating system can be applied.
Application Methods Compared: Roll-On, Spray, and Trowel Systems
How the coating is applied affects the final thickness, uniformity, and appearance.
| Application Method | Skill Level | Typical Use | Advantages | Disadvantages |
|---|---|---|---|---|
| Roll-On | DIY-Friendly | Solid color epoxies, primers, topcoats | Easy to control, minimal equipment needed | Can leave roller marks, difficult to achieve a perfectly uniform thickness |
| Spray | Professional | Thin topcoats, sealants | Very fast application, smooth finish | Requires expensive equipment, risk of overspray, requires proper ventilation |
| Trowel/Squeegee | Professional | Self-leveling coatings, metallic systems, repair mortars | Creates a perfectly flat and thick layer, ideal for decorative effects | Requires significant skill and speed, can be labor-intensive |
Drying, Curing, and Ideal Environmental Conditions
Understanding the difference between drying and curing is crucial for a successful outcome.
- Drying is the initial phase where the solvent or water in the coating evaporates, making the surface tacky or dry to the touch. This can happen in a few hours.
- Curing is the chemical process where the polymer chains cross-link to form a hard, durable film. This process takes much longer.
A residential concrete coating may be ready for light foot traffic in 24 hours, but it might not be fully cured and ready for vehicle traffic or heavy use for 3 to 7 days. The ideal conditions for application and curing are typically between 60-85°F (15-30°C) with low to moderate humidity. Applying a coating in conditions that are too cold, too hot, or too humid can interfere with the curing process, leading to a weak or flawed finish.
Maintenance Plan: Seasonal Care and Stain Removal Tips
One of the biggest advantages of a coated concrete floor is its low maintenance. However, a simple care plan will keep it looking its best for years.
- Regular Cleaning: Sweep or dust mop the surface regularly to remove abrasive dirt and grit. For deeper cleaning, use a pH-neutral cleaner and a microfiber mop. Avoid acidic or soap-based cleaners, which can dull the finish.
- Spill Management: Clean up spills immediately. While the surface is stain-resistant, corrosive chemicals or certain automotive fluids can damage the coating if left to sit for extended periods.
- Seasonal Checks: In the spring and fall, give the floor a thorough cleaning and inspect for any signs of damage or wear, particularly in high-traffic areas.
- Avoid Dragging: Lift heavy items instead of dragging them across the floor to prevent deep scratches. Use protective mats under jacks or other heavy equipment.
Durability Factors and Lifecycle Expectations
The lifespan of a residential concrete coating depends on several factors:
- Quality of Preparation: As mentioned, this is the most critical factor. Poor prep leads to premature failure.
- Product Quality: Professional-grade, 100% solids epoxies and polyaspartics will significantly outlast DIY kits from a big-box store.
- System Thickness: A thicker coating system provides more protection against impacts and abrasion.
- Type of Traffic: A garage floor that sees two cars daily will wear differently than a lightly used basement floor.
- Sunlight Exposure: For outdoor surfaces, using a UV-stable topcoat is essential to prevent yellowing and degradation.
With professional installation and proper care, a high-quality residential concrete coating system can easily last 15-20 years or more before needing a refresh, which often only involves a light sanding and a new topcoat.
Eco-Friendly Formulations and Health Considerations
As homeowners become more environmentally conscious, the demand for sustainable building materials has grown. The coatings industry has responded with healthier, more eco-friendly options. The key factor to look for is the VOC (Volatile Organic Compound) content.
VOCs are solvents that are released into the air as the coating cures. High-VOC products can contribute to poor indoor air quality and have a strong, lingering odor. When selecting a residential concrete coating, especially for interior spaces like basements or garages, look for:
- Low-VOC or Zero-VOC Formulations: These products use water or a higher percentage of solids as a carrier, significantly reducing harmful emissions.
- Water-Based Coatings: Water-based epoxies and urethanes have improved dramatically and now offer excellent performance with minimal odor and easy cleanup.
Looking ahead to 2026 and beyond, sustainability will be a major driver in product development, with a focus on bio-based resins and materials with a lower carbon footprint.
Common Problems and How to Diagnose Them
Even with careful planning, issues can arise. Understanding the cause is the first step to finding a solution.
- Peeling or Delamination: This is almost always caused by poor surface preparation or moisture issues. The coating is lifting off the concrete because it never achieved a proper bond.
- Bubbles or Blisters: These can be caused by applying the coating in direct sunlight (outgassing), high humidity, or applying it over a damp or un-primed surface.
- Hot Tire Pickup: This occurs when hot tires from a car soften a low-quality coating (often a one-part epoxy paint), which then peels up when the car is driven away. This is rare with professional-grade, multi-coat systems.
- Stains or Discoloration: This can be caused by chemical spills that were not cleaned up promptly or, for outdoor surfaces, a lack of a UV-stable topcoat.
When to Consult a Professional for Complex Issues
While some homeowners may be able to tackle a small, simple coating project, many situations warrant hiring a professional contractor.
- Large Areas: Coating a large two or three-car garage requires speed and efficiency that is difficult for a DIYer to achieve.
- Significant Repairs: If your concrete has extensive cracking, spalling, or is uneven, a professional will have the equipment and materials to perform durable repairs.
- Moisture Problems: If you suspect high moisture levels in your slab, a professional can perform quantitative moisture testing and install an appropriate moisture-mitigating barrier.
- Access to Better Equipment and Materials: Professionals use high-end materials and industrial-grade grinders that provide a far superior surface profile and a longer-lasting result than any DIY kit.
Summary Checklist for a Successful Coating Project
Use this checklist to guide your residential concrete coating project from start to finish.
- [ ] Assess Your Concrete: Check for cracks, stains, spalling, and moisture.
- [ ] Choose the Right System: Select an epoxy, polyaspartic, or other system based on your needs (e.g., UV stability for outdoors).
- [ ] Select Your Finish: Decide on colors, flake options, and sheen level. Don’t forget anti-slip additives for wet areas.
- [ ] Plan for Preparation: Do not skip this. Ensure the plan includes mechanical grinding, thorough cleaning, and necessary repairs.
- [ ] Check Environmental Conditions: Schedule the application for a time with moderate temperatures and low humidity.
- [ ] Understand Curing Times: Know how long you need to wait for foot traffic and vehicle traffic.
- [ ] Establish a Maintenance Plan: Have the right cleaners on hand and a plan for regular sweeping and inspections.
- [ ] Know When to Call a Pro: Be realistic about the scope of the project and your own skill level.
Further Reading and Resources
For those interested in the technical aspects of concrete and paving, the following resources provide in-depth information on related topics.
- Concrete Overlay: Learn about adding a new layer of concrete over an existing slab.
- Concrete Polishing: An alternative to coatings that involves grinding and densifying the concrete itself to a high-gloss finish.
- Asphalt Concrete: Understand the composition of asphalt, a common material for driveways.
- Asphalt vs Concrete: A detailed comparison of the two primary paving materials for driveways and roads.
- Sealcoating: Information on the process of applying a protective coating to asphalt pavement.
- Paving: A general overview of creating a hard surface for travel.